Connecting to the cluster
This cluster runs a Unix-based operating system, which is text based. The main way to interact with these machines is therefore not through a graphical user interface, as is the case for Windows and MacOS operating systems, but through text-based commands entered in a terminal window.
In this section, you will learn how to connect to the HPC systems using SSH (Secure Shell Protocol), either via an SSH client (Windows) or via SSH in a terminal (MacOS and Linux). Then, we explain how you can login to the systems without having to enter your password every time. Finally, you will learn how to transfer data between your own PC and the HPC systems.
Connecting
The connection through Grid is made using the SSH protocol, which encrypts all the data and passwords that are exchanged between your own PC and the HPC system. The way to connect depends on the type of local system that you use.
In all cases you access through one of the submit nodes. This is a set of publicly accessible nodes that you use as stepping stone to work with the batch system and compute nodes.
No long-running processes on submit nodes
The submit nodes are primarily meant for preparing and submitting jobs, checking on the status of your running jobs, and copying data to and from the HPC systems. The submit nodes are not meant for running compute jobs, or even testing compute jobs! Such processes would hinder the other users of the submit nodes. To aid in keeping the submit nodes usable for all users there is an automatic cleanup active on the submit nodes that will kill processes that take up too much CPU time and/or too much memory.
To use the cluster, you will need an account and to connect to the the cluster. You can log in to the submit host without having to be connected to UP's network, giving you the freedom to carry out your work from wherever you are.
Linux
Open a terminal window (for Ubuntu users: under Accessories - Terminal) and type
ssh <username>@submit.grid.fe.up.pt
If the ssh command cannot be found, you need to install the ssh-client. For Ubuntu users:
sudo apt-get install openssh-client
When connecting to the system for the first time, SSH will ask you to verify the ED25519 or RSA key fingerprint. Then, you will be asked for your password. Note that you will not see anything as you type your password, but the terminal does in fact register your keystrokes. To redirect any graphics output from Snellius to your own system, you'll need an X-server like XQuartz. Download and install it. Then, login to the system using (note that X is capitalized)
Now you are connected to the submit host and anything you now type is executed on the submit host. Notice that the prompt has changed and now shows the hostname of the machine as submit
Windows
First, you need to install an SSH client. The most convenient application is Bitwise SSH Client, as it also includes options for transferring files using an SFTP (SSH File Transfer Protocol) file browser and redirecting the graphical output from the HPC system to your local PC - we'll get to those options later. Alternatively, you can use Putty (a very basic SSH client) in combination with a separate FTP client like FileZilla and a separate X server application like xming to redirect graphical output. If you want to redirect graphical output using Putty, you also need to check the option 'Enable X11 forwarding' under Windows ⇒ Category ⇒ Tunnels.
Here, we will assume that you use Bitwise, you can download it from here (click on the “Bitvise SSH Client installer” link). After the installer is downloaded, you can run it by double clicking on it. Once it's installed, you can run the program and you will be presented with the following screen:
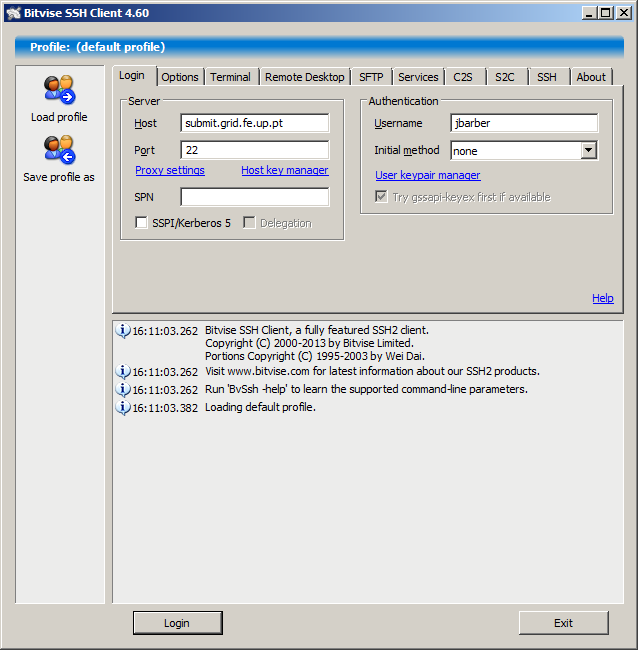
Here we show the Host field already set to submit.grid.fe.up.pt and the Username as jbarber, you will have to change these and use the username supplied to you via email. After you have changed these click “Login”, if your machine can reach the submit host will ask you to verify the ED25519 or RSA key fingerprint.
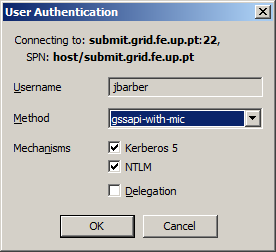
If the Fingerprint is correct, click “Accept and Save”, you can then click “OK” on the next dialog:
After which you will be prompted for your password. This password is the same password that you use to login to your other UP resources:
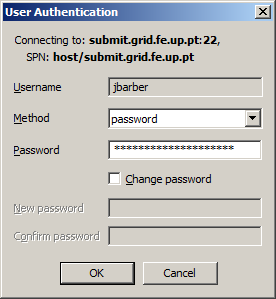
Assuming your password is correct, you should now be connected to the server! Two new windows will appear, the first one is similar to the Windows File Explorer and shows the files on your machine (on the left hand side) and those on the server on the right hand side. You can click and drag files between the two sides to transfer data to and from the cluster, or to manage files on the cluster (i.e. rename, move, copy or delete them). The second window is the terminal window. Anything you type here is executed on the submit host, it is from this Window that you can submit jobs to the cluster:
Apple
Open the 'Terminal' application (using the launchpad or in Finder from Application ⇒ Utilities ⇒ Terminal). In that terminal window, type
ssh <username>@submit.grid.fe.up.pt
When connecting to the system for the first time, SSH will ask you to verify the ED25519 or RSA key fingerprint. Then, you will be asked for your password. Note that you will not see anything as you type your password, but the terminal does in fact register your keystrokes.
To redirect any graphics output from the HPC system to your own system, you'll need an X-server like XQuartz. Download and install it. Then, login to the HPC system using (note that X is capitalized).
ssh -X <username>@submit.grid.fe.up.pt
Now, if you open a graphical window, it will display on the screen of your own PC. You can test this by executing the command
xeyes
on the HPC system, which should give you a window with two eyes following your mouse pointer. Note, you may need to Enable allow connections from clients in XQuartz (which can be enabled in Preferences → Security) as well as setting the local environment variable (export DISPLAY=:0).
Password-less login
You can use an RSA key-pair for loging in to a system without using a password.